> ## Documentation Index
> Fetch the complete documentation index at: https://hastekit.ai/docs/llms.txt
> Use this file to discover all available pages before exploring further.
# Virtual Keys
> Create and manage virtual keys for secure provider and model access control.
Virtual Keys provide a secure way to control access to LLM providers and models without exposing your actual provider API keys. They act as an abstraction layer that allows you to manage access permissions, rate limits, and model restrictions for different applications or users.
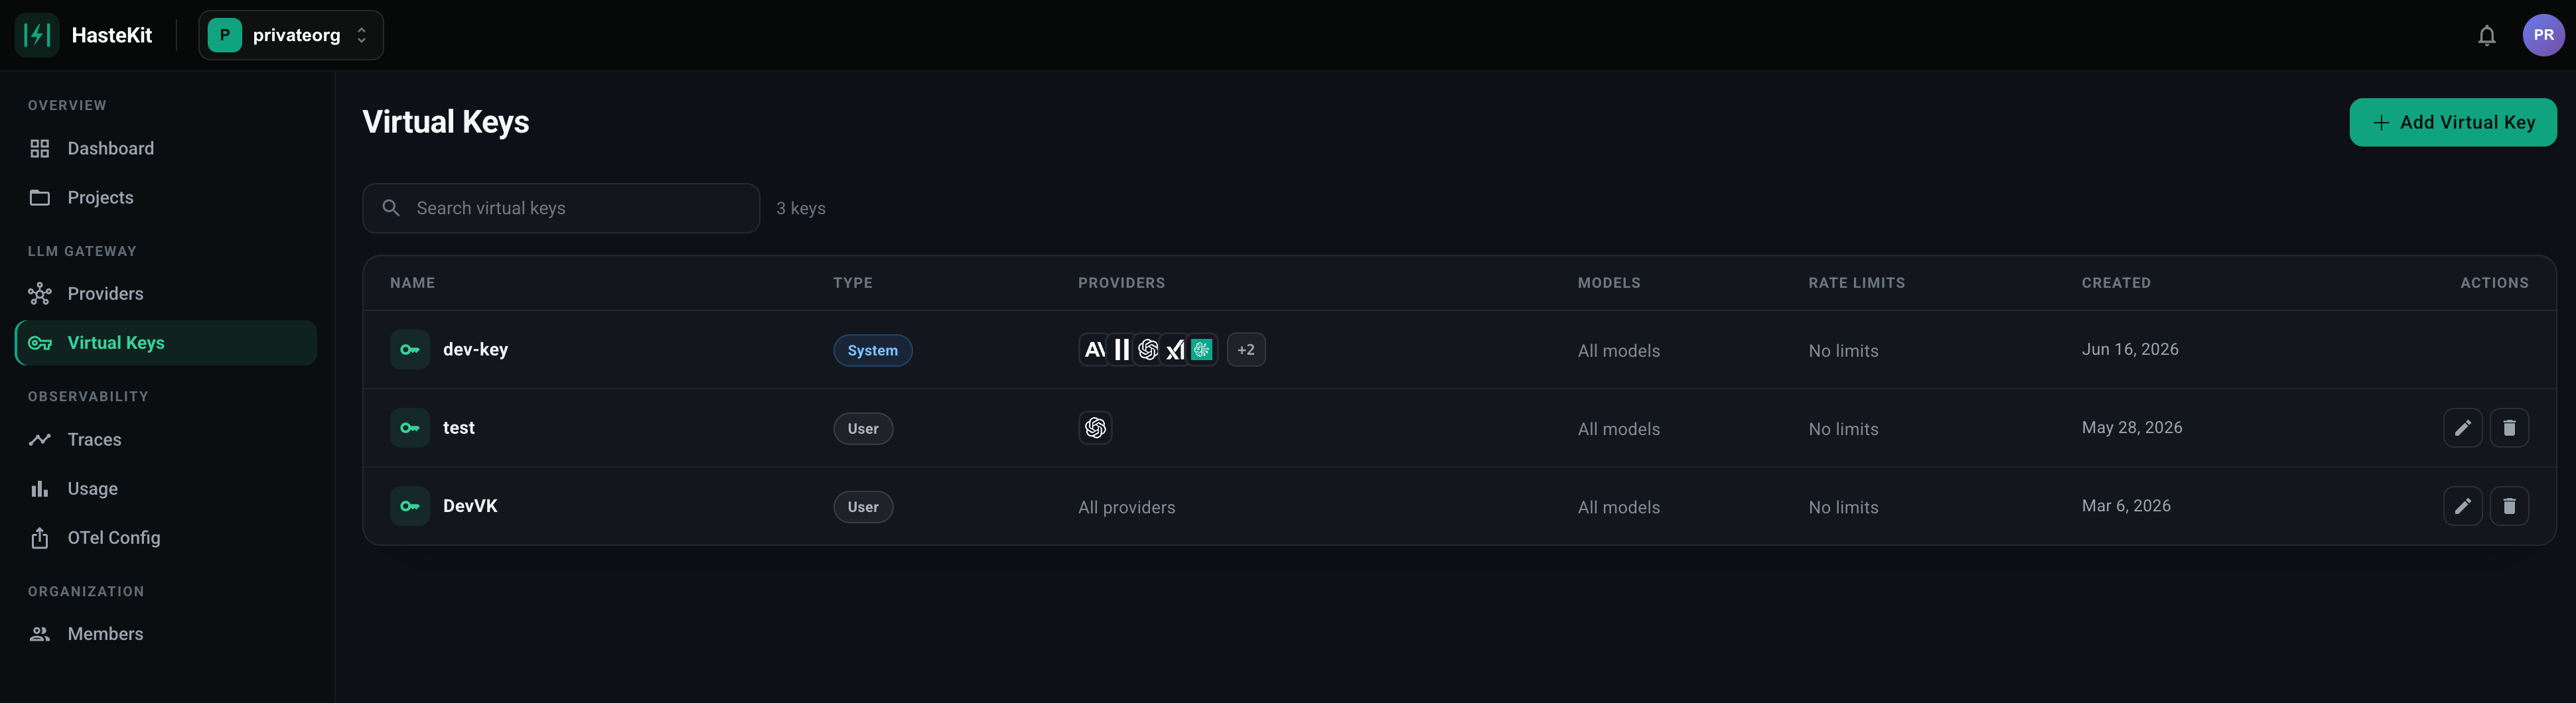 The Virtual Keys page displays all configured virtual keys in a table format, showing their names, secret keys, allowed providers, models, rate limits, and creation dates.
## What are Virtual Keys?
Virtual Keys are unique secret keys (prefixed with `sk-hk-`) that you can use instead of provider API keys in your applications. When a request comes in with a virtual key:
1. The gateway validates the virtual key
2. Checks which providers and models are allowed
3. Enforces rate limits if configured
4. Routes the request to the appropriate provider using your configured API keys
**Benefits:**
* **Security**: Your provider API keys remain hidden from end users
* **Access Control**: Restrict which providers and models can be accessed
* **Rate Limiting**: Control usage with configurable rate limits
* **Flexibility**: Different keys for different applications or environments
* **Monitoring**: Track usage per virtual key
## Creating a Virtual Key
To create a new virtual key:
1. Navigate to the **Virtual Keys** page in the dashboard
2. Click the **Add Virtual Key** button
3. Fill in the form:
* **Name**: Enter a descriptive name (e.g., "Production Access", "Development Access")
* **Providers**: Select one or more providers that this key can access (required)
* **Models** (Optional): Select specific models, or leave empty to allow all models
* **Rate Limits** (Optional): Configure rate limits (see below)
4. Click **Create**
The Virtual Keys page displays all configured virtual keys in a table format, showing their names, secret keys, allowed providers, models, rate limits, and creation dates.
## What are Virtual Keys?
Virtual Keys are unique secret keys (prefixed with `sk-hk-`) that you can use instead of provider API keys in your applications. When a request comes in with a virtual key:
1. The gateway validates the virtual key
2. Checks which providers and models are allowed
3. Enforces rate limits if configured
4. Routes the request to the appropriate provider using your configured API keys
**Benefits:**
* **Security**: Your provider API keys remain hidden from end users
* **Access Control**: Restrict which providers and models can be accessed
* **Rate Limiting**: Control usage with configurable rate limits
* **Flexibility**: Different keys for different applications or environments
* **Monitoring**: Track usage per virtual key
## Creating a Virtual Key
To create a new virtual key:
1. Navigate to the **Virtual Keys** page in the dashboard
2. Click the **Add Virtual Key** button
3. Fill in the form:
* **Name**: Enter a descriptive name (e.g., "Production Access", "Development Access")
* **Providers**: Select one or more providers that this key can access (required)
* **Models** (Optional): Select specific models, or leave empty to allow all models
* **Rate Limits** (Optional): Configure rate limits (see below)
4. Click **Create**
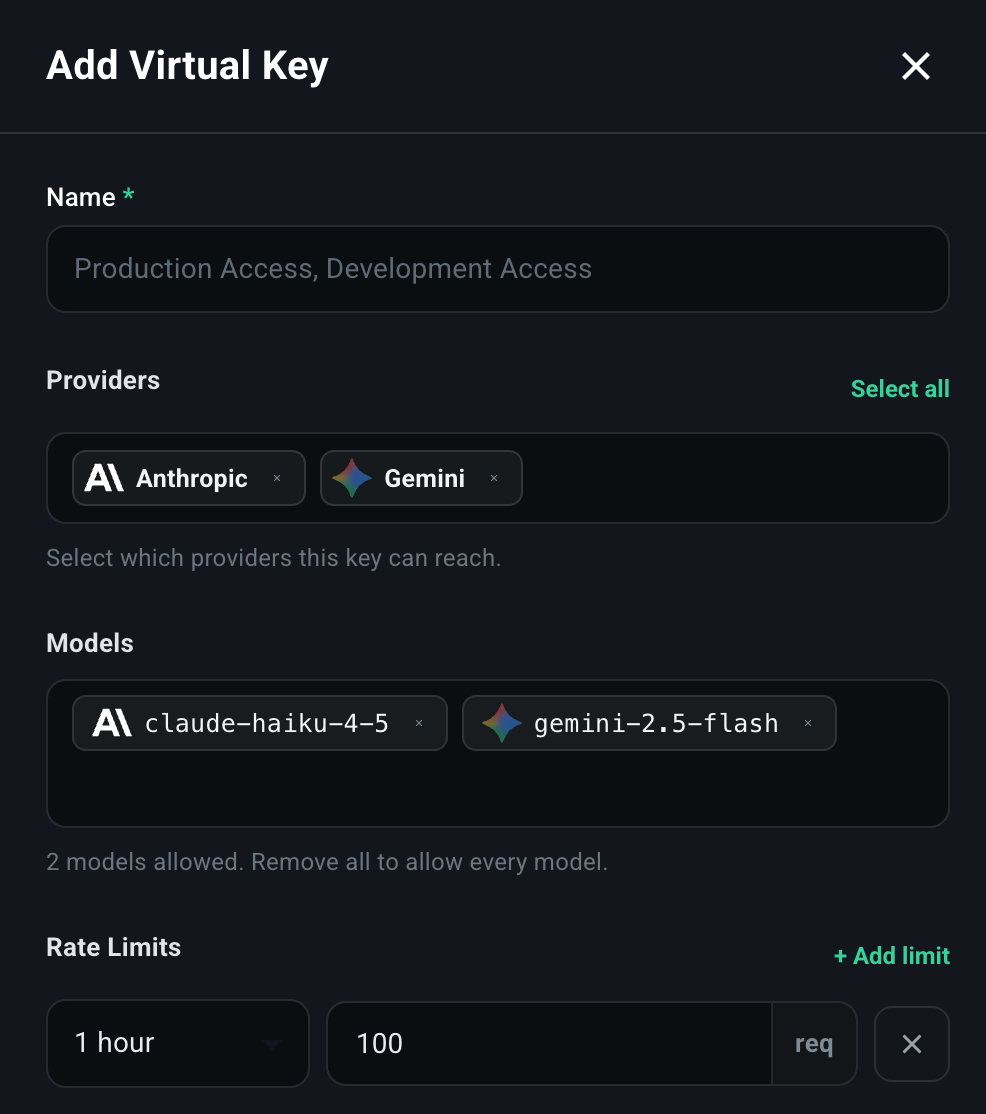 The virtual key will be automatically generated and displayed. Make sure to copy and save it securely, as it won't be shown again in full.
### Selecting Providers
You must select at least one provider for the virtual key. Available providers include:
* **OpenAI** - GPT models (GPT-4, GPT-3.5, etc.)
* **Anthropic** - Claude models
* **Gemini** - Google's Gemini models
* **xAI** - Grok models
* **Ollama** - Self-hosted models
You can select multiple providers to allow the virtual key to access any of them.
### Selecting Models
The **Models** field is optional. If left empty, the virtual key will have access to all models from the selected providers. If you want to restrict access to specific models:
1. Click the **Models** dropdown
2. Select the specific models you want to allow
3. You can select multiple models
**Note:** Leaving models empty provides the most flexibility, as new models from the selected providers will automatically be accessible.
### Configuring Rate Limits
Rate limits allow you to control how many requests can be made with a virtual key within a specific time period. You can configure multiple rate limits for different time windows.
To add a rate limit:
1. Click the **Add Limit** button in the Rate Limits section
2. Select a **Time Unit**:
* 1 minute
* 1 hour
* 6 hours
* 12 hours
* 1 day
* 1 week
* 1 month
3. Enter the **Limit** (number of requests allowed in that time period)
4. Click **Add Limit** again to add additional rate limits
**Example Rate Limit Configurations:**
* `10 requests per 1 minute` - Prevents burst traffic
* `100 requests per 1 hour` - Controls hourly usage
* `1000 requests per 1 day` - Daily quota management
You can combine multiple rate limits. For example:
* `10/1min` and `100/1h` - Allows 10 requests per minute, but no more than 100 per hour
When a rate limit is exceeded, the gateway will return an error and reject the request.
## Using Virtual Keys
Once created, you can use virtual keys in your applications just like provider API keys:
```bash theme={null}
# Using curl
curl -X POST https://your-gateway.com/api/gateway/openai/v1/chat/completions \
-H "Authorization: Bearer sk-hk-your-virtual-key-here" \
-H "Content-Type: application/json" \
-d '{"model": "gpt-4", "messages": [...]}'
```
```python theme={null}
# Using Python OpenAI SDK
from openai import OpenAI
client = OpenAI(
base_url="https://your-gateway.com/api/gateway/openai",
api_key="sk-hk-your-virtual-key-here"
)
response = client.chat.completions.create(
model="gpt-4",
messages=[{"role": "user", "content": "Hello!"}]
)
```
The virtual key will be validated, and if allowed, the request will be routed to the appropriate provider using your configured API keys.
The virtual key will be automatically generated and displayed. Make sure to copy and save it securely, as it won't be shown again in full.
### Selecting Providers
You must select at least one provider for the virtual key. Available providers include:
* **OpenAI** - GPT models (GPT-4, GPT-3.5, etc.)
* **Anthropic** - Claude models
* **Gemini** - Google's Gemini models
* **xAI** - Grok models
* **Ollama** - Self-hosted models
You can select multiple providers to allow the virtual key to access any of them.
### Selecting Models
The **Models** field is optional. If left empty, the virtual key will have access to all models from the selected providers. If you want to restrict access to specific models:
1. Click the **Models** dropdown
2. Select the specific models you want to allow
3. You can select multiple models
**Note:** Leaving models empty provides the most flexibility, as new models from the selected providers will automatically be accessible.
### Configuring Rate Limits
Rate limits allow you to control how many requests can be made with a virtual key within a specific time period. You can configure multiple rate limits for different time windows.
To add a rate limit:
1. Click the **Add Limit** button in the Rate Limits section
2. Select a **Time Unit**:
* 1 minute
* 1 hour
* 6 hours
* 12 hours
* 1 day
* 1 week
* 1 month
3. Enter the **Limit** (number of requests allowed in that time period)
4. Click **Add Limit** again to add additional rate limits
**Example Rate Limit Configurations:**
* `10 requests per 1 minute` - Prevents burst traffic
* `100 requests per 1 hour` - Controls hourly usage
* `1000 requests per 1 day` - Daily quota management
You can combine multiple rate limits. For example:
* `10/1min` and `100/1h` - Allows 10 requests per minute, but no more than 100 per hour
When a rate limit is exceeded, the gateway will return an error and reject the request.
## Using Virtual Keys
Once created, you can use virtual keys in your applications just like provider API keys:
```bash theme={null}
# Using curl
curl -X POST https://your-gateway.com/api/gateway/openai/v1/chat/completions \
-H "Authorization: Bearer sk-hk-your-virtual-key-here" \
-H "Content-Type: application/json" \
-d '{"model": "gpt-4", "messages": [...]}'
```
```python theme={null}
# Using Python OpenAI SDK
from openai import OpenAI
client = OpenAI(
base_url="https://your-gateway.com/api/gateway/openai",
api_key="sk-hk-your-virtual-key-here"
)
response = client.chat.completions.create(
model="gpt-4",
messages=[{"role": "user", "content": "Hello!"}]
)
```
The virtual key will be validated, and if allowed, the request will be routed to the appropriate provider using your configured API keys.